Remote learning has never been more important than in today’s environment. Software developer Instructure and their flagship program Canvas have helped educate millions of children and corporate learners through e-learning. Canvas is a platform that allows educators to quickly concept a learning workflow that harnesses multimedia objects, standard text, and assessments to teach any topic at scale.
But what happens if you have students, parents, or employees who speak another language? What’s the best way to translate a Canvas project? Read on for a detailed set of instructions on how to accomplish this important task.
Getting content out of Canvas
1. Log into Canvas as a teacher or administrator.
2. Open the course that has content that needs to be translated.
3. Click on Settings on the bottom left

4. On the right, click on Export Course Content

5. Select “Course” as the Export Type Click Create Export

Depending on the amount of content in the course, processing can take a while. When your course has completed exporting, you will get a message saying your content has been exported. You might also need to reload your webpage to see the current export. Click on your Course Export to download it to your computer.
6. Your export will download as a file that has the name of your course with an added .imscc (Common Cartridge).

7. Rename this file to a .zip and upload the .zip file to your translation provider.

10. Repeat the above steps, changing your Export Type to Quiz if you have quizzes you need to have translated.
Canvas translation process
Before your translation provider can begin translation of the content from Canvas, which is basically XML content, they will need to build a parsing template to handle all of the required content.
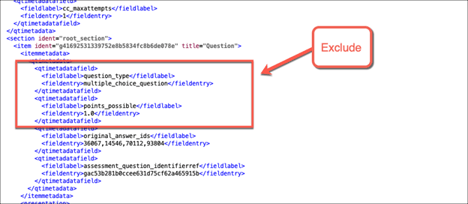
That will include a deep analysis of the XML markup to determine all of the proper tags to include and exclude from the project. Here is an example of some of the text in a typical project:

This will get a little tricky as your provider will need to handle nested HTML within XML content. Round trip testing is really helpful here as you will likely have to round trip the files to and from Canvas until you discover that you have included all of the proper fields for translation. Here is an example of the type of content that gets excluded from the translation project.

Getting translated content into Canvas
1. Your translation provider should send you back .zip files. Download the file to your computer.
2. Starting with your Content (non-quiz) file, rename it from .zip to .imscc

3. Importing Content into a course that already has content can have unintended consequences. It is STRONGLY recommended that you create a new course in Canvas and use this to import your translated content.
4. Log into Canvas and go to your Dashboard.
5. On the bottom right, click on Start a New Course
6. Name your course and click on Create Course.
7. Click on Import Existing Content.
8. Use the dropdown to select Canvas Course Export Package
9. Click Choose File. Navigate to where you downloaded the .imscc file. Select All Content. Click Import.

10. Your job will run. This “running” can take a long time if you have a large course.
11. When you see Completed, your translated content is now in your new course. Use the Canvas navigation to explore it.
12. If you submitted quizzes to be translated too, you should download that file. In Settings select Import Content.
13. Use the dropdown to select the QTI .zip file. Click Choose File and select your .zip translated quiz file. Click Import.
NOTE: You do not need to select a Question Bank.

Congratulations! You’ve just successfully translated your Canvas course!


_11zon.webp?width=438&height=197&name=translator%20with%20computer%20and%20files-1%20(2)_11zon.webp)

